The collector is ready. Now, when the wheat is ripe, it is necessary to destroy the block of earth and the water will bring the entire crop to the collection point. You can also use a piston or a dispenser with a bucket of water instead of a block with earth, then you just need to turn it off.
For versions 1.8 and higher. A very easy farm to build. It is fully automatic and picking and landing as well. Using a resident.
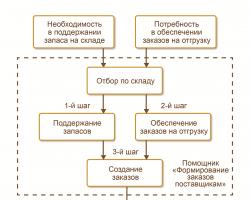
You can build a fully automatic farm that is even more complex, taking into account zombie attacks, ripening time and the resident’s inverter.
When implementing, it should be taken into account that when a farmer settles on a farm, the game will create a new village in the given area, so the farm must either be built outside the border of the existing village (and the future border of the village being created should also be taken into account), or all residents within a radius of fifty blocks must be removed. If you plan to have several farms (at least you will have two: carrots and wheat), then they should be located within the boundaries of the village being created.
The farmer's house must be equipped with a lock (two pistons closing the door from the outside) and a system for supplying planting material inside the house (an ejector in the wall of the house, directed into the room and a funnel under the farmer's feet). The lock should only lock the house during the day, so that a farmer who is late for the night can run into the house the next night.
The crop should be collected with water in funnels. To do this, you need to build a reservoir and a system of pistons on one side of the farm. From the funnels, the crop must fall into the chest, from where it must be conveyed through funnels and ejectors to the farmer's house, from where it must again fall into the chest.
On Days 1, 2, and 3, the resident is locked in the house all day. The harvest is ripening. The most interesting thing begins on the night from the third to the 4th day:
A very fast farm, capable of growing wheat, carrots and potatoes. Uses dispensers to grow and a plunger to harvest.
By changing the recognition of light level updates in 1.8, in this version of the game it became possible to create a much simpler and faster auto-farm using bone meal.
This farm uses the absence of light over a block of wheat instead of a piston and water to harvest the crop.
There is also a variant of what the author calls a “progressive” farm. In appearance, it is very different from the classic types of farms. IN in this case, 2 sources of water are used: the first is used to moisten the beds, and the second is for harvesting. The video below clearly demonstrates all the stages of creating such a farm. It is worth noting that, unlike the farm presented in the video, it is possible to create a larger sample (the size of the area for sowing is 9 by 9 blocks).
The mud block can be replaced with a piston on the red stone control, and the water can be opened remotely.
Advantages
In fact, you can build an automatic farm of any size, but when building large farms, it will not be possible to create a water system for delivering the crop to the collection point - you will have to manually collect the crop along the edge of the farm.
In this article I will try to answer the question of beginners “how to create a wheat farm in minecraft”. The farm will be the most ordinary one, without automatic assembly, but with automatic irrigation of the land (the land will not dry out). The advantages of such a farm are simple creation, beautiful view, given that wheat is easy to harvest, you won't waste much time creating wheat for food if you use a regular farm. Also in the article there will be the basics, I will answer the question of where to get wheat seeds, what tools are needed and show necessary recipes crafting.
1. First of all, you need to collect wheat seeds. To do this, we hit the grass with our hands; it breaks off quite easily and from time to time wheat seeds fly out of it. In theory, 1 seed is enough for you, you can get several more from it, more of them, etc., but it’s better to get more of them, at least 8 of them.

2. You will need tools:
(preferably)
Bucket of water (highly recommended)
Hoe (required)
A shovel and a hoe can be made from, but a bucket is made only from iron; at first you can do without a bucket and water, then you will need to constantly work with a hoe before planting the seeds. Here are the crafting recipes:


You need 6 iron ingots or 3 iron ingots and 3 wood (stone, gold). To fill a bucket with water, go to the pond and right-click on the water while holding the empty bucket.
3. Find or create a flat area of dirt (dirt) and use a shovel to dig a 15x1 block hole.

4. Pour a bucket of water exactly in the center of the hole (on block 8), it should reach both ends of the dug hole.

5. Using a hoe, cultivate the ground on both sides of the trench with water with a range of 4 blocks, beyond 4 blocks the water will not affect the ground. Plant the seeds. The wheat farm is ready, all that remains is to talk about a couple of nuances that will help novice farmers.

When the wheat is ready it will look like the image below. It can be collected with bare hands; one collected wheat will drop 1-2 wheat and 1-3 seeds.

Important to know:
1. Wheat will grow instantly if you sprinkle it with bone meal. Bone meal is made from bones that can be obtained by killing a skeleton. Using bone meal, you can very quickly create a large farm from a few seeds.

2. If you jump onto a garden bed or walk over it several times, it will turn into ordinary soil, so create fences from mobs, and it wouldn’t hurt to create walls and a ceiling, since there will definitely be those who will not only trample your garden bed, but and will fill it with water and lava.
3. If there is insufficient lighting, wheat seeds will “fly” out of the ground, install several or another lighting fixture if this happens.
Wheat grows in garden beds if wheat seeds are planted there. In order for wheat to grow, it is necessary that there is water in no more than 4 cells. The water should be at the same height as the bed. In addition, for wheat to grow, it requires lighting (light from the Sun, torches or lava).
If you jump on the wheat, it will die and the bed will turn into simple soil. Therefore, it is recommended to make a glass roof on the garden bed at a height of two blocks. So that you could walk along the garden bed, but you couldn’t jump.
If you pour water on wheat that has not yet ripened, the seeds will fall out. If you pour water on an already ripe one, both the seeds and the harvest will fall out. This property can be used to create mechanical farms and quickly harvest wheat.
Bone meal can be used to speed up the growth of wheat. On average, it will require from 1 to 3 units of bone meal in order to obtain ripened wheat from planted seeds.
Wheat can be grown even underground when artificial lighting from lava or torches.
Wheat is mainly used for cooking. You can make bread from it. This will require only 3 wheat. You can also make a cake that you can bite into pieces. But for this you will need more ingredients (milk, sugar, chicken egg). If you can find cocoa beans, you can make cookies.
Wheat can be used to make a sheaf of hay, which can be used for compact storage of wheat, as a decorative element, or for feeding horses and foals. However, for these purposes it is better to use not the sheaf, but the wheat itself, because this will give better results.
Wheat is also used to attract and breed sheep and cows. If you give wheat to two sheep or two cows, hearts will appear above them, and soon a lamb or calf will appear.
Wheat is also called: Wheat.
Wheat is present in Minecraft versions: 1.8.2, 1.8.1, 1.8, 1.7.10, 1.7.9, 1.7.5, 1.6.4, 1.5.2.
While playing Minecraft, each player needs some resources that will help him survive. One of the most important such resources is food. Food can be obtained from animals and some plants. Over time, everyone gets tired of chasing their prey, so the question becomes how to provide themselves with enough food with minimal loss of time.
An excellent solution to this problem would be to build a farm. There are several types of farms. Let's consider only the main ones. Considering that the main source of nutrition is meat, then breeding animals is a priority. But in order to reproduce animals, some resources are needed.
The most valuable such product is wheat. Building a farm for this plant is very simple. The main rule for wheat to grow is moist soil. To moisten the soil, it is necessary to place the water no further than 4 blocks from the bed. The simplest farm looks like a 9x9 block with one block of water in the center. After this, it is worth enclosing the area with a fence and brightening it with torches. To plant wheat, the ground must be tilled with a hoe. These are instructions for building a farm with manual harvesting.
To make a farm with automatic harvesting, you need to use the property of wheat, in which the finished plant falls to the ground. This happens when it is exposed to water. To build a farm, create small channels through which water will flow. Pour a bucket of water at one end of the channel and turn it off. At the other end, make a hole into which the wheat will fall. Plant wheat in the canal, but make sure that the water is no further than four blocks. You can open the flow of water by sending a signal to the piston, which, when active, blocks the flow of water. If you make several channels and many pistons, they must be connected so that collection occurs simultaneously throughout the entire farm. After the water runs through the channels, it will wash away all the wheat into the depression, and you can safely harvest.
Now the finished wheat can be used to breed animals on another farm. To do this, you will need an animal fence and a pair of the same type. Pressing the right mouse button with wheat in your hands on an adult makes you look for its mate for reproduction. This way you can increase the number of your livestock until they provide you with enough food.
Another interesting farm is the collection farm chicken eggs. To do this you will need funnels and a chest. Place the funnels and the chest on the same plane so that they touch, and then fence everything off with blocks. The entire floor of your chicken farm should be covered only with funnels. After that, put the chickens in there and wait for them to start laying eggs. The eggs will fall into the funnels and then into the chest. Thus, you need to check the chest periodically to collect eggs.
To build a cactus or reed farm, you must use a rule that allows you to not completely destroy the plant to obtain resources. Cacti and reeds grow a maximum of 3 blocks up. If you destroy the second block, the third one will also fall out as a resource. The farm will be a canal with water, which is located next to a planting of plants. For cactus, this is only necessary for harvesting, but reed cannot grow if there is no water nearby. The water should create a flow in one direction. At the end of the stream it is necessary to make a depression to collect resources. Plants should be planted in one row next to this channel. Cacti cannot be planted point-blank. At the level of the second block, it is necessary to position the piston so that when activated it destroys it in the plant. It turns out that there should be as many pistons as there are plants. Connect the pistons into one circuit and install the switch. Now, after reaching a height of 3 blocks, it is enough to activate the pistons, and they will throw resources into the stream of water. All that remains is to collect them.
These are just the main types of farms. Once you understand the mechanics of the game and how the pistons work, you will be able to create huge automatic farms.
Pretty wheat farm effective way get food. Wheat can be made into a variety of foods, including sweets such as cake, cookies, and bread. Animals can also be propagated using wheat. We will make a simple and automatic wheat farm.
Step one. Looking for seeds:
The first thing you need to do is find the seeds. You need to find the herbs and knock them down with your hand. Not in all cases the seeds will drop. You need to knock down 30-50 blades of grass to get 30 seeds.
Step two. We dig 3 rows:
We need to dig 3 rows. Length of your choice.
Step three. We pour water into the rows and dig up the ground.
The third step is to pour water into the rows. It is desirable that they be complete.
After all this we get this:
Step four.
We plant seeds in the ground, make a fence so that mobs don’t trample the seeds, put torches so that the plants grow at night.
The farm is ready, after the seeds grow they will turn yellow. After that, collect the wheat by clicking the right mouse button. After this, if you have trampled the ground, plow it again and plant the seeds again. They will fall out along with the wheat.